
Android6.0系統啟動流程分析三:SystemServer程序
在上一篇部落格 Android6.0系統啟動流程分析二:zygote程序一文中,我們隊Zygote程序的有了一定的瞭解。我們知道Zygote程序會啟動SystemServer程序,但我們並沒有在上篇文章中分析SystemServer程序的相關內容。這篇部落格,我們將目標匯聚在SystemServer程序上,看看這個程序都做了什麼事情。
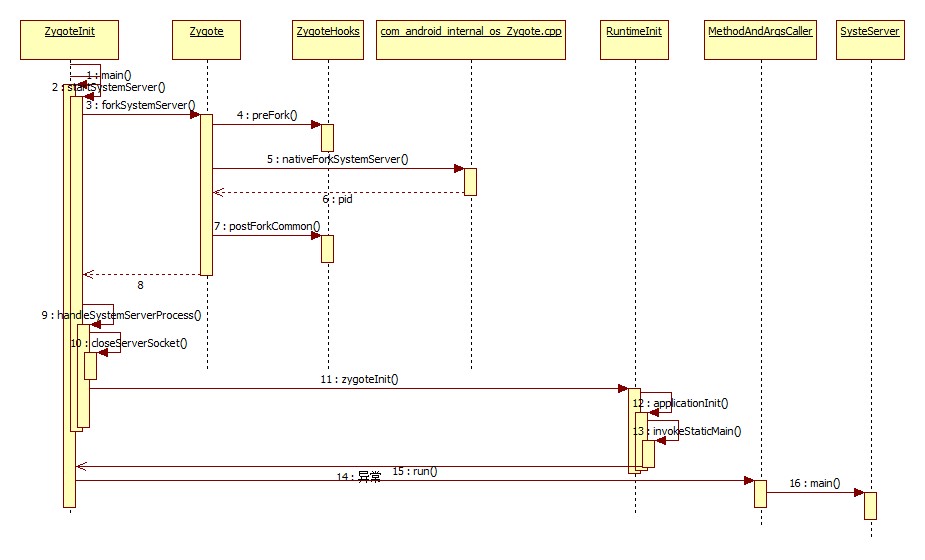
SystemServer啟動流程參考如下時序圖:
下面將分階段對SysteServer進行分析。
SystemServer程序分析
在ZygoteInit的main方法中,啟動了SystemServer程序:
...
if 啟動使用的是startSystemServer方法,這個方法也定義在ZygoteInit類中:
/**
* Prepare the arguments and fork for the system server process.
*/
private static boolean startSystemServer(String abiList, String socketName)
throws 這個方法做了兩件事情:
1. 建立SystemServer程序:Zygote.forkSystemServer
2. 做後續的初始化工作:handleSystemServerProcess
建立SystemServer程序
SystemServer程序的建立入口是forkSystemServer方法,這個方法定義在frameworks\base\core\java\com\android\internal\os\Zygote中:
    public static int forkSystemServer(int uid, int gid, int[] gids, int debugFlags,
            int[][] rlimits, long permittedCapabilities, long effectiveCapabilities) {
        VM_HOOKS.preFork();
        int pid = nativeForkSystemServer(
                uid, gid, gids, debugFlags, rlimits, permittedCapabilities, effectiveCapabilities);
        // Enable tracing as soon as we enter the system_server.
        if (pid == 0) {
            Trace.setTracingEnabled(true);
        }
        VM_HOOKS.postForkCommon();
        return pid;
    }
這個方法做的三件事情:
1. VM_HOOKS.preFork(),做準備工作。
2. nativeForkSystemServer,建立子程序
3. VM_HOOKS.postForkCommon();啟動Zygote的4個Daemon執行緒,java堆整理,引用佇列,以及析構執行緒。
和我們在上一篇部落格 Android6.0系統啟動流程分析二:zygote程序中分析的”Zygote建立子程序的過程”一節中分析到Zygote程序建立一個子程序(SystemServer除外的程序)也需要做三件事:
1. VM_HOOKS.preFork(),做準備工作。
2. nativeForkAndSpecialize,建立子程序
3. VM_HOOKS.postForkCommon();啟動Zygote的4個Daemon執行緒,java堆整理,引用佇列,以及析構執行緒。
對比可見這兩個過程非常的相似,只有呼叫建立子程序的方法不一樣,因此,這一步我們只分析nativeForkSystemServer方法,其他的請參考上一篇部落格的”Zygote建立子程序的過程”。
nativeForkSystemServer方法定義在frameworks\base\core\jni\com_android_internal_os_Zygote.cpp 中:
static jint com_android_internal_os_Zygote_nativeForkSystemServer(
        JNIEnv* env, jclass, uid_t uid, gid_t gid, jintArray gids,
        jint debug_flags, jobjectArray rlimits, jlong permittedCapabilities,
        jlong effectiveCapabilities) {
  pid_t pid = ForkAndSpecializeCommon(env, uid, gid, gids,
                                      debug_flags, rlimits,
                                      permittedCapabilities, effectiveCapabilities,
                                      MOUNT_EXTERNAL_DEFAULT, NULL, NULL, true, NULL,
                                      NULL, NULL);
  if (pid > 0) {
      // The zygote process checks whether the child process has died or not.
      ALOGI("System server process %d has been created", pid);
      gSystemServerPid = pid;
      // There is a slight window that the system server process has crashed
      // but it went unnoticed because we haven't published its pid yet. So
      // we recheck here just to make sure that all is well.
      int status;
      if (waitpid(pid, &status, WNOHANG) == pid) {
          ALOGE("System server process %d has died. Restarting Zygote!", pid);
          RuntimeAbort(env);
      }
  }
  return pid;
}
對比下建立其他子程序時的過程,我麼發現建立SystemServer程序使用的是nativeForkSystemServer方法,也就是上面這個方法,而建立普通程序使用的是nativeForkAndSpecialize方法,我們對比下這個方法:
static jint com_android_internal_os_Zygote_nativeForkAndSpecialize(
        JNIEnv* env, jclass, jint uid, jint gid, jintArray gids,
        jint debug_flags, jobjectArray rlimits,
        jint mount_external, jstring se_info, jstring se_name,
        jintArray fdsToClose, jstring instructionSet, jstring appDataDir) {
    // Grant CAP_WAKE_ALARM to the Bluetooth process.
    jlong capabilities = 0;
    if (uid == AID_BLUETOOTH) {
        capabilities |= (1LL << CAP_WAKE_ALARM);
    }

    return ForkAndSpecializeCommon(env, uid, gid, gids, debug_flags,
            rlimits, capabilities, capabilities, mount_external, se_info,
            se_name, false, fdsToClose, instructionSet, appDataDir);
}
可以看到建立SystemServer多瞭如下程式碼:
  if (pid > 0) {
      // The zygote process checks whether the child process has died or not.
      ALOGI("System server process %d has been created", pid);
      gSystemServerPid = pid;
      // There is a slight window that the system server process has crashed
      // but it went unnoticed because we haven't published its pid yet. So
      // we recheck here just to make sure that all is well.
      int status;
      if (waitpid(pid, &status, WNOHANG) == pid) {
          ALOGE("System server process %d has died. Restarting Zygote!", pid);
          RuntimeAbort(env);
      }
  }
這段程式碼是在父程序中執行的,如今成會檢測子程序有沒有掛掉,因為SystemServer非常重要,所以它的生死必須非常重視。
從中我們可以知道SystemServer和其他程序的建立過程並沒有什麼重大的區別,只不過由於SystemServer程序的重要性,Zygote程序會對他“多加關照”。
既然他們的建立過程沒有多大的區別,那麼問題是:普通的程序建立後會執行ActivityThread的main方法,那麼SystemServer程序會執行什麼方法呢?
SystemServer程序的後續初始化
後續初始化工作是從handleSystemServerProcess方法開始的。這個方法定義在frameworks\base\core\java\com\android\internal\os\ZygoteInit類中:
   private static void handleSystemServerProcess(
            ZygoteConnection.Arguments parsedArgs)
            throws ZygoteInit.MethodAndArgsCaller {

        closeServerSocket();

        // set umask to 0077 so new files and directories will default to owner-only permissions.
        Os.umask(S_IRWXG | S_IRWXO);

        if (parsedArgs.niceName != null) {
            Process.setArgV0(parsedArgs.niceName);
        }

        final String systemServerClasspath = Os.getenv("SYSTEMSERVERCLASSPATH");
        if (systemServerClasspath != null) {
            performSystemServerDexOpt(systemServerClasspath);
        }

        if (parsedArgs.invokeWith != null) {
            String[] args = parsedArgs.remainingArgs;
            // If we have a non-null system server class path, we'll have to duplicate the
            // existing arguments and append the classpath to it. ART will handle the classpath
            // correctly when we exec a new process.
            if (systemServerClasspath != null) {
                String[] amendedArgs = new String[args.length + 2];
                amendedArgs[0] = "-cp";
                amendedArgs[1] = systemServerClasspath;
                System.arraycopy(parsedArgs.remainingArgs, 0, amendedArgs, 2, parsedArgs.remainingArgs.length);
            }

            WrapperInit.execApplication(parsedArgs.invokeWith,
                    parsedArgs.niceName, parsedArgs.targetSdkVersion,
                    VMRuntime.getCurrentInstructionSet(), null, args);
        } else {
            ClassLoader cl = null;
            if (systemServerClasspath != null) {
                cl = new PathClassLoader(systemServerClasspath, ClassLoader.getSystemClassLoader());
                Thread.currentThread().setContextClassLoader(cl);
            }

            /*
             * Pass the remaining arguments to SystemServer.
             */
            RuntimeInit.zygoteInit(parsedArgs.targetSdkVersion, parsedArgs.remainingArgs, cl);
        }

        /* should never reach here */
    }
這個方法做兩件事情:
1.關掉從父程序繼承下來的socket。
2呼叫RuntimeInit.zygoteInit做進一步初始化。
zygoteInit方法定義在frameworks\base\core\java\com\android\internal\os\RuntimeInit類中:
    public static final void zygoteInit(int targetSdkVersion, String[] argv, ClassLoader classLoader)
            throws ZygoteInit.MethodAndArgsCaller {
        if (DEBUG) Slog.d(TAG, "RuntimeInit: Starting application from zygote");

        Trace.traceBegin(Trace.TRACE_TAG_ACTIVITY_MANAGER, "RuntimeInit");
        redirectLogStreams();

        commonInit();
        nativeZygoteInit();
        applicationInit(targetSdkVersion, argv, classLoader);
    }
這個方法在上一節分析Zygote程序建立普通子程序的時候已經分析過了,它的關鍵在applicationInit方法中。
applicationInit方法如下:
  private static void applicationInit(int targetSdkVersion, String[] argv, ClassLoader classLoader)
            throws ZygoteInit.MethodAndArgsCaller {
        // If the application calls System.exit(), terminate the process
        // immediately without running any shutdown hooks.  It is not possible to
        // shutdown an Android application gracefully.  Among other things, the
        // Android runtime shutdown hooks close the Binder driver, which can cause
        // leftover running threads to crash before the process actually exits.
        nativeSetExitWithoutCleanup(true);

        // We want to be fairly aggressive about heap utilization, to avoid
        // holding on to a lot of memory that isn't needed.
        VMRuntime.getRuntime().setTargetHeapUtilization(0.75f);
        VMRuntime.getRuntime().setTargetSdkVersion(targetSdkVersion);

        final Arguments args;
        try {
            args = new Arguments(argv);
        } catch (IllegalArgumentException ex) {
            Slog.e(TAG, ex.getMessage());
            // let the process exit
            return;
        }

        // The end of of the RuntimeInit event (see #zygoteInit).
        Trace.traceEnd(Trace.TRACE_TAG_ACTIVITY_MANAGER);

        // Remaining arguments are passed to the start class's static main
        invokeStaticMain(args.startClass, args.startArgs, classLoader);
    }
這個方法會呼叫invokeStaticMain來呼叫SystemServer的main方法,這麼說是因為args.startClass的值就是“com.android.server.SystemServer”。我們在呼叫startSystemServer啟動SystemServer程序之初就給他指明瞭引數:
        String args[] = {
            "--setuid=1000",
            "--setgid=1000",
            "--setgroups=1001,1002,1003,1004,1005,1006,1007,1008,1009,1010,1018,1021,1032,3001,3002,3003,3006,3007",
            "--capabilities=" + capabilities + "," + capabilities,
            "--nice-name=system_server",
            "--runtime-args",
            "com.android.server.SystemServer",
        };
少許跟蹤就會知道這裡的args.startClass=“com.android.server.SystemServer”。
invokeStaticMain方法如下:
    private static void invokeStaticMain(String className, String[] argv, ClassLoader classLoader)
            throws ZygoteInit.MethodAndArgsCaller {
        Class<?> cl;

        try {
            cl = Class.forName(className, true, classLoader);
        } catch (ClassNotFoundException ex) {
            throw new RuntimeException(
                    "Missing class when invoking static main " + className,
                    ex);
        }

        Method m;
        try {
            m = cl.getMethod("main", new Class[] { String[].class });
        } catch (NoSuchMethodException ex) {
            throw new RuntimeException(
                    "Missing static main on " + className, ex);
        } catch (SecurityException ex) {
            throw new RuntimeException(
                    "Problem getting static main on " + className, ex);
        }

        int modifiers = m.getModifiers();
        if (! (Modifier.isStatic(modifiers) && Modifier.isPublic(modifiers))) {
            throw new RuntimeException(
                    "Main method is not public and static on " + className);
        }

        /*
         * This throw gets caught in ZygoteInit.main(), which responds
         * by invoking the exception's run() method. This arrangement
         * clears up all the stack frames that were required in setting
         * up the process.
         */
        throw new ZygoteInit.MethodAndArgsCaller(m, argv);
    }
這個方法首先會根據類名找到Class物件,然後獲得這個類的main方法,也就是com.android.server.SystemServer的main方法了。最後丟擲一個異常,這個異常定義如下:
    public static class MethodAndArgsCaller extends Exception
            implements Runnable {
        /** method to call */
        private final Method mMethod;

        /** argument array */
        private final String[] mArgs;

        public MethodAndArgsCaller(Method method, String[] args) {
            mMethod = method;
            mArgs = args;
        }

        public void run() {
            try {
                mMethod.invoke(null, new Object[] { mArgs });
            } catch (IllegalAccessException ex) {
                throw new RuntimeException(ex);
            } catch (InvocationTargetException ex) {
                Throwable cause = ex.getCause();
                if (cause instanceof RuntimeException) {
                    throw (RuntimeException) cause;
                } else if (cause instanceof Error) {
                    throw (Error) cause;
                }
                throw new RuntimeException(ex);
            }
        }
    }
}
這個異常是一個Runnable,這個異常丟擲以後,會在ZygoteInit的main方法中捕獲到:
catch (MethodAndArgsCaller caller) {
            caller.run();
        }
捕獲的異常後會執行異常的run方法,這個方法已經貼過了,會在這個方法中通過mMethod.invoke(null, new Object[] { mArgs });來啟動SystemServer的main方法。
這樣,SystemServer程序就來到com.android.server.SystemServer的main方法了.
執行SystemServer的main方法
SystemServer類定義在frameworks\base\services\java\com\android\server目錄下,其main方法如下:
    public static void main(String[] args) {
        new SystemServer().run();
    }
執行SystemServer的run方法,run方法如下:
   private void run() {
        // If a device's clock is before 1970 (before 0), a lot of
        // APIs crash dealing with negative numbers, notably
        // java.io.File#setLastModified, so instead we fake it and
        // hope that time from cell towers or NTP fixes it shortly.
        if (System.currentTimeMillis() < EARLIEST_SUPPORTED_TIME) {
            Slog.w(TAG, "System clock is before 1970; setting to 1970.");
            SystemClock.setCurrentTimeMillis(EARLIEST_SUPPORTED_TIME);
        }

        // If the system has "persist.sys.language" and friends set, replace them with
        // "persist.sys.locale". Note that the default locale at this point is calculated
        // using the "-Duser.locale" command line flag. That flag is usually populated by
        // AndroidRuntime using the same set of system properties, but only the system_server
        // and system apps are allowed to set them.
        //
        // NOTE: Most changes made here will need an equivalent change to
        // core/jni/AndroidRuntime.cpp
        if (!SystemProperties.get("persist.sys.language").isEmpty()) {
            final String languageTag = Locale.getDefault().toLanguageTag();

            SystemProperties.set("persist.sys.locale", languageTag);
            SystemProperties.set("persist.sys.language", "");
            SystemProperties.set("persist.sys.country", "");
            SystemProperties.set("persist.sys.localevar", "");
        }

        // Here we go!
        Slog.i(TAG, "Entered the Android system server!");
        EventLog.writeEvent(EventLogTags.BOOT_PROGRESS_SYSTEM_RUN, SystemClock.uptimeMillis());

        // In case the runtime switched since last boot (such as when
        // the old runtime was removed in an OTA), set the system
        // property so that it is in sync. We can't do this in
        // libnativehelper's JniInvocation::Init code where we already
        // had to fallback to a different runtime because it is
        // running as root and we need to be the system user to set
        // the property. http://b/11463182
        SystemProperties.set("persist.sys.dalvik.vm.lib.2", VMRuntime.getRuntime().vmLibrary());

        // Enable the sampling profiler.
        if (SamplingProfilerIntegration.isEnabled()) {
            SamplingProfilerIntegration.start();
            mProfilerSnapshotTimer = new Timer();
            mProfilerSnapshotTimer.schedule(new TimerTask() {
                @Override
                public void run() {
                    SamplingProfilerIntegration.writeSnapshot("system_server", null);
                }
            }, SNAPSHOT_INTERVAL, SNAPSHOT_INTERVAL);
        }

        // Mmmmmm... more memory!
        VMRuntime.getRuntime().clearGrowthLimit();

        // The system server has to run all of the time, so it needs to be
        // as efficient as possible with its memory usage.
        VMRuntime.getRuntime().setTargetHeapUtilization(0.8f);

        // Some devices rely on runtime fingerprint generation, so make sure
        // we've defined it before booting further.
        Build.ensureFingerprintProperty();

        // Within the system server, it is an error to access Environment paths without
        // explicitly specifying a user.
        Environment.setUserRequired(true);

        // Ensure binder calls into the system always run at foreground priority.
        BinderInternal.disableBackgroundScheduling(true);

        // Prepare the main looper thread (this thread).
        android.os.Process.setThreadPriority(
                android.os.Process.THREAD_PRIORITY_FOREGROUND);
        android.os.Process.setCanSelfBackground(false);
        Looper.prepareMainLooper();

        // Initialize native services.
        System.loadLibrary("android_servers");

        // Check whether we failed to shut down last time we tried.
        // This call may not return.
        performPendingShutdown();

        // Initialize the system context.
        createSystemContext();

        // Create the system service manager.
        mSystemServiceManager = new SystemServiceManager(mSystemContext);
        LocalServices.addService(SystemServiceManager.class, mSystemServiceManager);

        // Start services.
        try {
            startBootstrapServices();
            startCoreServices();
            startOtherServices();
        } catch (Throwable ex) {
            Slog.e("System", "******************************************");
            Slog.e("System", "************ Failure starting system services", ex);
            throw ex;
        }

        // For debug builds, log event loop stalls to dropbox for analysis.
        if (StrictMode.conditionallyEnableDebugLogging()) {
            Slog.i(TAG, "Enabled StrictMode for system server main thread.");
        }

        // Loop forever.
        Looper.loop();
        throw new RuntimeException("Main thread loop unexpectedly exited");
    }
這個類做的事情很多了,我能理解的有:
1. 初始化Looper:Looper.prepareMainLooper();
2. 裝載本地庫:System.loadLibrary(“android_servers”);
3. 向系統註冊SystemService程序:
        // Create the system service manager.
        mSystemServiceManager = new SystemServiceManager(mSystemContext);
        LocalServices.addService(SystemServiceManager.class, mSystemServiceManager);
SystemService管理系統中所有的Service,它必須其他Service註冊之前被註冊。
4.啟動其他的系統服務:
            startBootstrapServices();
            startCoreServices();
            startOtherServices();
下面簡要瀏覽下這幾個方法啟動的服務:
4-1 startBootstrapServices簡要瀏覽下:
  private void startBootstrapServices() {
        // Wait for installd to finish starting up so that it has a chance to
        // create critical directories such as /data/user with the appropriate
        // permissions.  We need this to complete before we initialize other services.
        Installer installer = mSystemServiceManager.startService(Installer.class);

        // Activity manager runs the show.
        mActivityManagerService = mSystemServiceManager.startService(
                ActivityManagerService.Lifecycle.class).getService();
        mActivityManagerService.setSystemServiceManager(mSystemServiceManager);
        mActivityManagerService.setInstaller(installer);

        // Power manager needs to be started early because other services need it.
        // Native daemons may be watching for it to be registered so it must be ready
        // to handle incoming binder calls immediately (including being able to verify
        // the permissions for those calls).
        mPowerManagerService = mSystemServiceManager.startService(PowerManagerService.class);

        // Now that the power manager has been started, let the activity manager
        // initialize power management features.
        mActivityManagerService.initPowerManagement();

        // Manages LEDs and display backlight so we need it to bring up the display.
        mSystemServiceManager.startService(LightsService.class);
        ...
這裡面的都是重量級服務
A.ActivityManagerService,Activity管理服務
B.建立並註冊apk安裝服務,並想ActivityManagerService註冊。
C.註冊電源管理服務
D.LED服務
E.PowerManagerService,包管理服務
…
4-2 startCoreServices:
    private void startCoreServices() {
        // Tracks the battery level.  Requires LightService.
        mSystemServiceManager.startService(BatteryService.class);

        // Tracks application usage stats.
        mSystemServiceManager.startService(UsageStatsService.class);
        mActivityManagerService.setUsageStatsManager(
                LocalServices.getService(UsageStatsManagerInternal.class));
        // Update after UsageStatsService is available, needed before performBootDexOpt.
        mPackageManagerService.getUsageStatsIfNoPackageUsageInfo();

        // Tracks whether the updatable WebView is in a ready state and watches for update installs.
        mSystemServiceManager.startService(WebViewUpdateService.class);
    }
核心服務並不多:
A.電池管理服務
B.跟蹤應用程式使用狀態的服務
C.WebViewUpdateService
4-3 startOtherServices
       try {
            Slog.i(TAG, "Reading configuration...");
            SystemConfig.getInstance();

            Slog.i(TAG, "Scheduling Policy");
            ServiceManager.addService("scheduling_policy", new SchedulingPolicyService());

            mSystemServiceManager.startService(TelecomLoaderService.class);

            Slog.i(TAG, "Telephony Registry");
            telephonyRegistry = new TelephonyRegistry(context);
            ServiceManager.addService("telephony.registry", telephonyRegistry);

            Slog.i(TAG, "Entropy Mixer");
            entropyMixer = new EntropyMixer(context);

            mContentResolver = context.getContentResolver();

            Slog.i(TAG, "Camera Service");
            mSystemServiceManager.startService(CameraService.class);

            // The AccountManager must come before the ContentService
            try {
                // TODO: seems like this should be disable-able, but req'd by ContentService
                Slog.i(TAG, "Account Manager");
                accountManager = new AccountManagerService(context);
                ServiceManager.addService(Context.ACCOUNT_SERVICE, accountManager);
            } catch (Throwable e) {
                Slog.e(TAG, "Failure starting Account Manager", e);
            }
這個方法中啟動的服務非常的多,藍芽服務,Wifi服務,SystemUI服務等都在這裡啟動。請讀者自行了解。
啟動launcher和傳送開機完成廣播
這個方法中有個很重要的點需要了解:那就是啟動Luncher與傳送開機廣播始於此。
        // We now tell the activity manager it is okay to run third party
        // code.  It will call back into us once it has gotten to the state
        // where third party code can really run (but before it has actually
        // started launching the initial applications), for us to complete our
        // initialization.
        mActivityManagerService.systemReady(new Runnable() {
            @Override
            public void run() {
                Slog.i(TAG, "Making services ready");
                mSystemServiceManager.startBootPhase(
                        SystemService.PHASE_ACTIVITY_MANAGER_READY);

                try {
                    mActivityManagerService.startObservingNativeCrashes();
                } catch (Throwable e) {
                    reportWtf("observing native crashes", e);
                }

                Slog.i(TAG, "WebViewFactory preparation");
                WebViewFactory.prepareWebViewInSystemServer();

                try {
                    startSystemUi(context);
                } catch (Throwable e) {
                    reportWtf("starting System UI", e);
                }
                ...
這裡,當所有系統準備好了以後,就會呼叫ActivityManagerService.systemReady方法,這個方法當如下:
   public void systemReady(final Runnable goingCallback) {
        synchronized(this) {
            if (mSystemReady) {
                // If we're done calling all the receivers, run the next "boot phase" passed in
                // by the SystemServer
                if (goingCallback != null) {
                    goingCallback.run();
                }
                return;
            }

            mLocalDeviceIdleController
                    = LocalServices.getService(DeviceIdleController.LocalService.class);

    ...
            // Start up initial activity.
            mBooting = true;
            startHomeActivityLocked(mCurrentUserId, "systemReady");

    ...
這個方法非常長,但是重點的是它會呼叫startHomeActivityLocked方法,這個方法最終會啟動Launcher。至於開機完成廣播的傳送過程,由於code比較複雜,這裡就不展開了。
做完這些事情以後,SystemServer就進入了Looper.loop()中了。有訊息來就執行,沒有訊息來就睡眠。